Managing Experiments with GraphGym
GraphGym is a platform for designing and evaluating Graph Neural Networks (GNNs), as originally proposed in the “Design Space for Graph Neural Networks” paper. We now officially support GraphGym as part of of PyG.
Warning
GraphGym API may change in the future as we are continuously working on better and deeper integration with PyG.
Highlights
Highly modularized pipeline for GNN:
Data: Data loading and data splitting
Model: Modularized GNN implementations
Tasks: Node-level, edge-level and graph-level tasks
Evaluation: Accuracy, ROC AUC, …
Reproducible experiment configuration:
Each experiment is fully described by a configuration file
Scalable experiment management:
Easily launch thousands of GNN experiments in parallel
Auto-generate experiment analyses and figures across random seeds and experiments
Flexible user customization:
Easily register your own modules, such as data loaders, GNN layers, loss functions, etc
Why GraphGym?
TL;DR: GraphGym is great for GNN beginners, domain experts and GNN researchers.
Scenario 1: You are a beginner to graph representation learning and want to understand how GNNs work:
You probably have read many exciting papers on GNNs, and try to write your own GNN implementation. Even if using raw PyG, you still have to code up the essential pipeline on your own. GraphGym is a perfect place for your to start learning about standardized GNN implementation and evaluation.

Figure 1: Modularized GNN implementation.
Scenario 2: You want to apply GNNs to your exciting application:
You probably know that there are hundreds of possible GNN models, and selecting the best model is notoriously hard. Even worse, the GraphGym paper shows that the best GNN designs for different tasks differ drastically. GraphGym provides a simple interface to try out thousands of GNNs in parallel and understand the best designs for your specific task. GraphGym also recommends a “go-to” GNN design space, after investigating 10 million GNN model-task combinations.
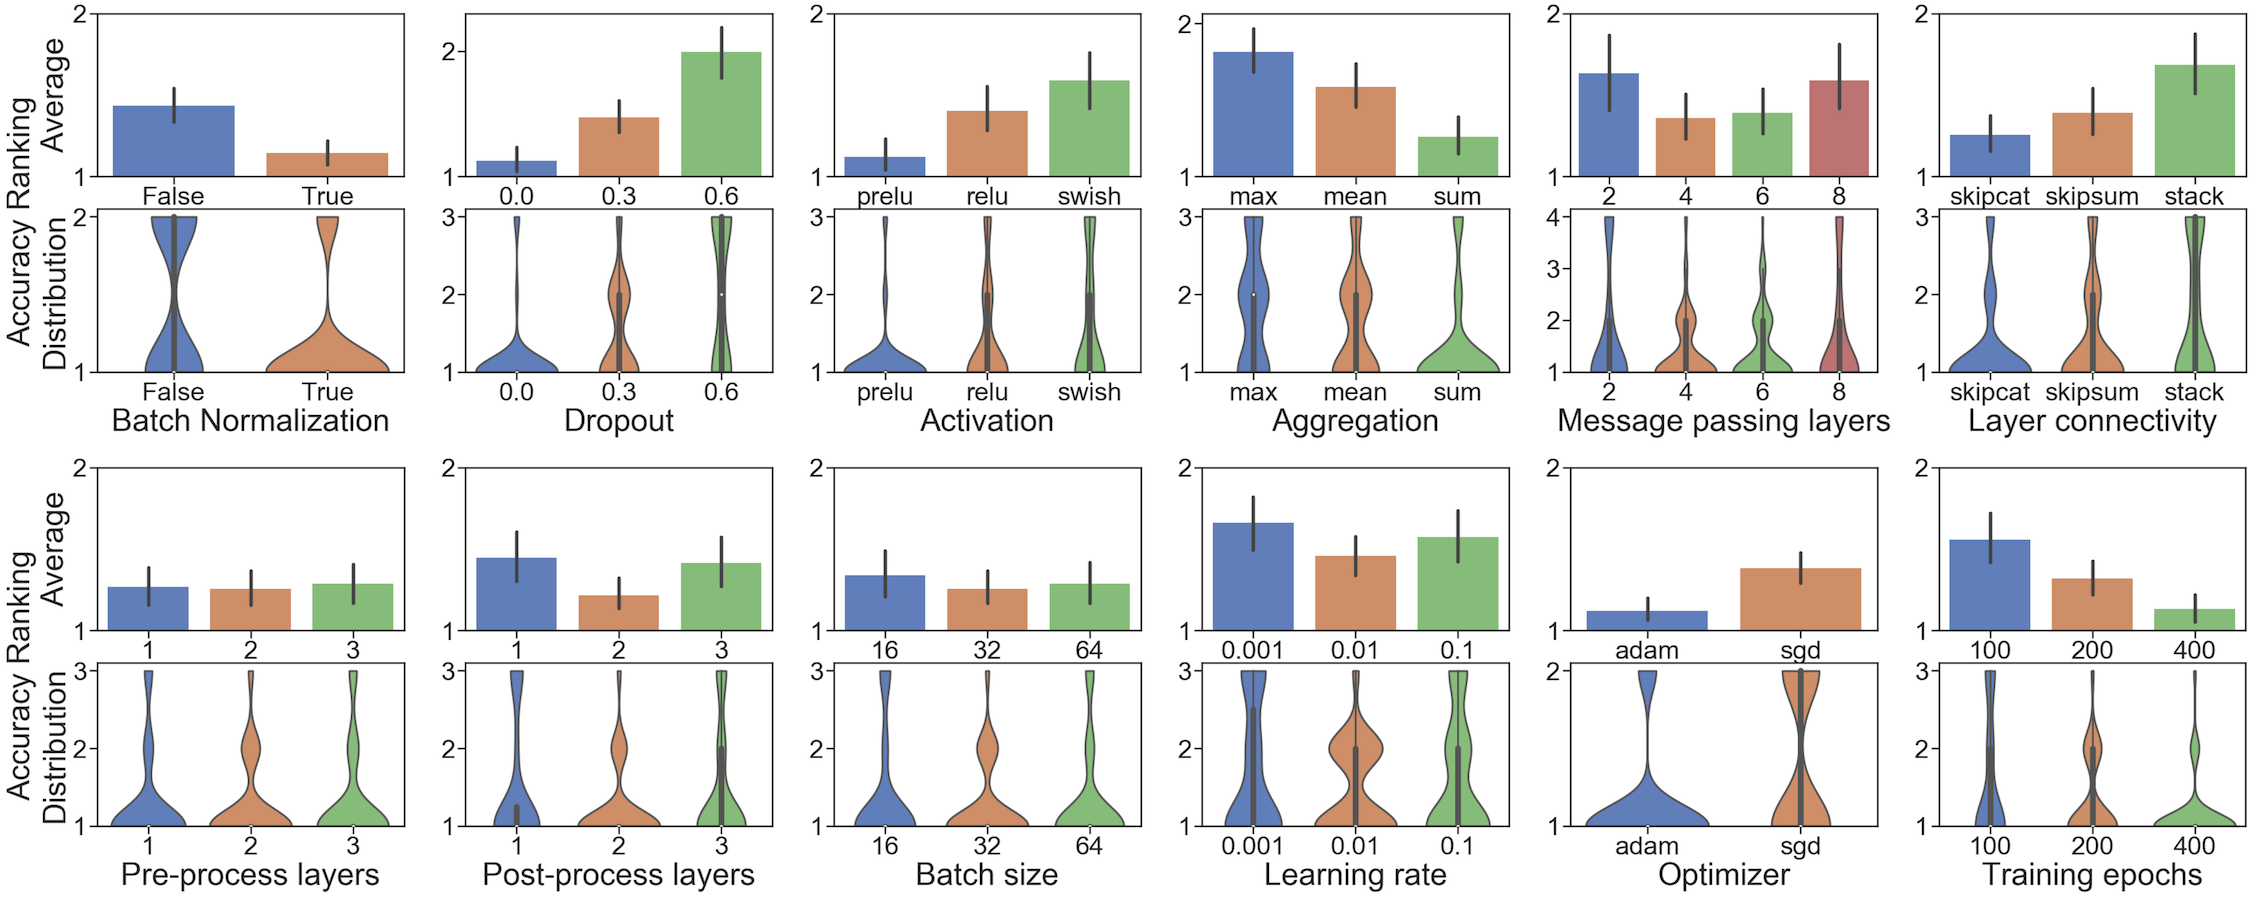
Figure 2: A guideline for desirable GNN design choices.
Scenario 3: You are a GNN researcher, who wants to innovate new GNN models or propose new GNN tasks:
Say you have proposed a new GNN layer ExampleConv.
GraphGym can help you convincingly argue that ExampleConv is better than, e.g., GCNConv:
When randomly sampling from 10 million possible model-task combinations, how often will ExampleConv will outperform GCNConv when everything else is fixed (including computational costs)?
Moreover, GraphGym can help you easily do hyper-parameter search, and visualize what design choices are better.
In sum, GraphGym can greatly facilitate your GNN research.

Figure 3: Evaluation of a given GNN design dimension, e.g., BatchNorm.
Basic Usage
To use GraphGym, you need to clone PyG from Github, then change to the graphgym/ directory.
git clone https://github.com/pyg-team/pytorch_geometric.git
cd pytorch_geometric/graphgym
Run a single experiment: Run an experiment using GraphGym via
run_single.sh. Configurations are specified inconfigs/example_node.yaml. The default experiment is about node classification on thePlanetoiddatasets (using a random 80/20 train/validation split).bash run_single.sh # run a single experimentRun a batch of experiments: Run a batch of experiments using GraphGym via
run_batch.sh. Configurations are specified inconfigs/example_node.yaml(controls the basic architecture) andgrids/example.txt(controls how to do grid search). The experiment examines 96 models in the recommended GNN design space, on 2 graph classification datasets. Each experiment is repeated 3 times, and we set up that 8 jobs can be concurrently run. Depending on your infrastructure, finishing all the experiments may take a long time; you can quit the experiment viaCtrl-C(GraphGym will properly kill all the processes).bash run_batch.sh # run a batch of experimentsRun GraphGym with CPU backend: GraphGym supports CPU backend as well – you only need to add the line
device: cputo the*.yamlfile. Here we provide an example:bash run_single_cpu.sh # run a single experiment using CPU backend
In-Depth Usage
To use GraphGym, you need to clone PyG from Github, then change to the graphgym/ directory.
git clone https://github.com/pyg-team/pytorch_geometric.git
cd pytorch_geometric/graphgym
Run a single experiment: A full example is specified in
run_single.sh.Specify a configuration file: In GraphGym, an experiment is fully specified by a
*.yamlfile. Unspecified configurations in the*.yamlfile will be populated by the default values intorch_geometric.graphgym.set_cfg(). For example, inconfigs/example_node.yaml, there are configurations for the dataset, training procedure, model, etc. Concrete description for each configuration is described inset_cfg().Launch an experiment: For example, in
run_single.sh:python main.py --cfg configs/example_node.yaml --repeat 3You can specify the number of different random seeds to repeat via
--repeat.Understand the results: Experimental results will be automatically saved in
results/${CONFIG_NAME}/. In the example above, this amounts toresults/example_node/. Results for different random seeds will be saved in different subdirectories, e.g.,results/example_node/2. The aggregated results over all the random seeds are automatically generated intoresults/example/agg, including the mean and standard deviation_stdfor each metric. Train/validation/test results are further saved into subdirectories, such asresults/example/agg/val. Here,stats.jsonstores the results after each epoch aggregated across random seeds, andbest.jsonstores the results of the epoch with the highest validation accuracy.
Run a batch of experiments: A full example is specified in
run_batch.sh.Specify a base file: GraphGym supports running a batch of experiments. To start, a user needs to select a base architecture via
--config. The batch of experiments will be created by perturbing certain configurations of the base architecture.(Optionally) specify a base file for computational budget: Additionally, GraphGym allows a user to select a base architecture to control the computational budget for the grid search via
--config_budget. The computational budget is currently measured by the number of trainable parameters, and the control is achieved by auto-adjusting the hidden dimensionality of the underlying GNN. If no--config_budgetis provided, GraphGym will not control the computational budget.Specify a grid file: A grid file describes how to perturb the base file, in order to generate the batch of experiments. For example, the base file could specify an experiment of a 3-layer GCN for node classification on the
Planetoiddatasets. Then, the grid file specifies how to perturb the experiment along different dimensions, such as the number of layers, the model architecture, the dataset, the level of task, etc.Generate configuration files for the batch of experiments based on the information specified above: For example, in
run_batch.sh:python configs_gen.py --config configs/${DIR}/${CONFIG}.yaml \ --config_budget configs/${DIR}/${CONFIG}.yaml \ --grid grids/${DIR}/${GRID}.txt \ --out_dir configs
Launch the batch of experiments: For example, in
run_batch.sh:bash parallel.sh configs/${CONFIG}_grid_${GRID} $REPEAT $MAX_JOBS $SLEEP
Each experiment will be repeated for
$REPEATtimes. We implemented a queue system to sequentially launch all the jobs, with$MAX_JOBSconcurrent jobs running at the same time. In practice, our system works great when handling thousands of jobs.Understand the results: Experimental results will be automatically saved in directory
results/${CONFIG_NAME}_grid_${GRID_NAME}/. In the example above, this amounts toresults/example_grid_example/. After running each experiment, GraphGym additionally automatically averages across different models, saved inresults/example_grid_example/agg. There,val.csvrepresents the validation accuracy for each model configuration at the final epoch,val_best.csvrepresents the results at the epoch with the highest average validation accuracy, andval_best_epoch.csvrepresents the results at the epoch with the highest validation accuracy averaged over different random seeds. When a test set split is provided,test.csvrepresents the test accuracy for each model configuration at the final epoch,test_best.csvrepresents the test set results at the epoch with the highest average validation accuracy, andtest_best_epoch.csvrepresents the test set results at the epoch with the highest validation accuracy averaged over different random seeds.
Customizing GraphGym
A highlight of GraphGym is that it allows you to easily register customized modules. For each project, you can have a unique GraphGym copy with different customized modules. For example, the “Design Space for Graph Neural Networks” and “Identity-aware Graph Neural Networks” papers represent two successful projects using customized GraphGym, and you may find more details about them here. Eventually, every GraphGym-powered project will be unique.
There are two ways for customizing GraphGym:
Use the
graphgym/custom_graphgymdirectory outside the PyG package: You can register your customized modules here without touching PyG. This use case will be great for your own customized project.Use the
torch_geometric/graphgym/contribdirectory inside the PyG package: If you have come up with a nice customized module, you can directly copy your files intotorch_geometric/graphgym/contrib, and create a pull request to PyG. This way, your idea can ship with PyG installations, and will have a much higher visibility and impact.
Concretely, the supported customized modules includes
Activations:
custom_graphgym/act/Customized configurations:
custom_graphgym/config/Feature augmentations:
custom_graphgym/feature_augment/Feature encoders:
custom_graphgym/feature_encoder/GNN heads:
custom_graphgym/head/GNN layers:
custom_graphgym/layer/Data loaders:
custom_graphgym/loader/Loss functions:
custom_graphgym/loss/GNN network architectures:
custom_graphgym/network/Optimizers:
custom_graphgym/optimizer/GNN global pooling layers (for graph classification only):
custom_graphgym/pooling/GNN stages:
custom_graphgym/stage/GNN training pipelines:
custom_graphgym/train/Data transformations:
custom_graphgym/transform/
Within each directory, at least one example is provided that shows how to register customized modules via torch_geometric.graphgym.register().
Note that new customized modules may result in new configurations.
In these cases, new configuration fields can be registered via custom_graphgym/config/.